Plastic headlights on modern vehicles are prone to becoming cloudy or yellowed due to exposure to sunlight, harsh weather conditions, and road chemicals. This cloudiness is not just a cosmetic issue; it significantly reduces the effectiveness and compromising safety.
The cloudiness results from oxidation, a natural process where the plastic reacts with oxygen and sunlight, leading to a dull, yellowed appearance. Sunlight is the primary culprit in headlight cloudiness.
Ultraviolet (UV) rays from the sun break down the plastic, causing it to oxidize and yellow. This process is exacerbated by other environmental factors like rain, snow, and pollutants, which can accelerate the degradation of the headlight material.
Even the most well-designed models aren’t immune to these effects over time. On the other side, there are many solutions available that will return the shine to your headlights, and baking soda is one of the best options.
Why Baking Soda is Perfect for Cleaning?
Baking soda’s mild abrasive nature allows it to gently scrub away the yellowed oxidized layer. It’s effective enough to make a noticeable difference but gentle enough not to scratch or damage the plastic.
This balance is crucial for maintaining the integrity of the headlights while restoring their clarity. The effectiveness of baking soda comes from its ability to react chemically with the oxidized layer.
When mixed with water, it forms a paste that can be easily applied and worked into the headlight’s surface. This paste helps to lift and dissolve the oxidation, leaving the headlights looking clearer and more transparent.
How to Use it Properly?
Cleaning with baking soda is a simple, cost-effective method that can be done at home with minimal tools and expertise. By following these steps, you can restore your headlights to their former clarity.
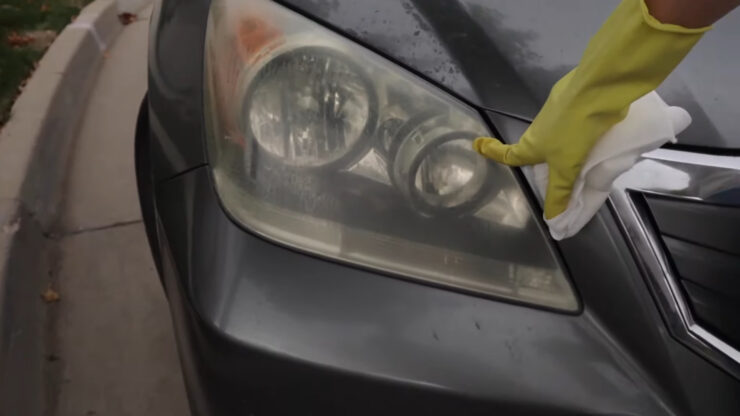
Before you begin, it’s essential to properly prepare the lights and the surrounding area. Start by washing the headlights with regular soap and water to remove any dirt or grime. Then, tape off the area around the headlights to protect your car’s paint from any accidental scratches during the cleaning process.
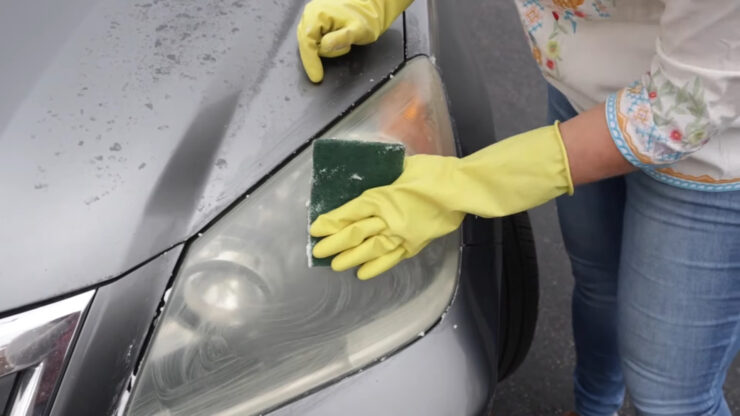
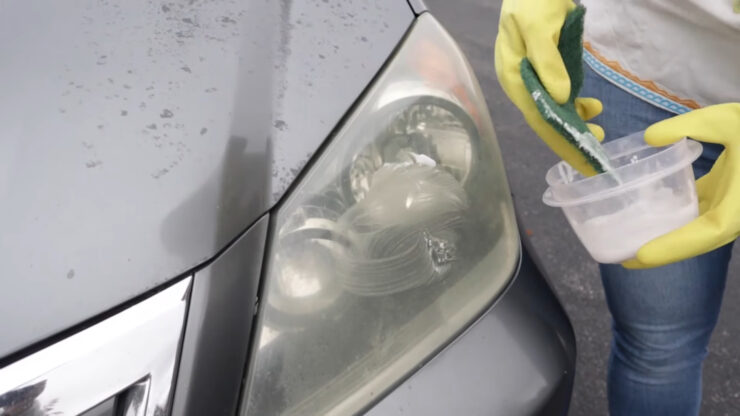
To clean with baking soda, start by mixing two parts baking soda with one part water to create a thick paste. Apply this paste to the headlights using a sponge or cloth, then rub it in with circular motions.
The abrasive nature of the baking soda will work to remove the oxidation. After a few minutes of scrubbing, rinse thoroughly with water and dry them with a clean cloth.
What Are the Alternatives?
While baking soda is effective for many, it’s not the only household item that can be used to clean headlights. White vinegar and toothpaste are also popular choices for DIY headlight cleaning.
Vinegar
White vinegar, thanks to its acidity, can be an effective cleaner as well. The acid in vinegar helps to break down the oxidized layer, much like baking soda. To use vinegar, mix it with equal parts water, apply it to the headlights, and let it sit for a few minutes before rinsing it off.
Toothpaste
Toothpaste, particularly whitening toothpaste, can also be used to clean headlights. The mild abrasives in toothpaste can help remove the oxidized layer, similar to baking soda.
Apply the toothpaste directly to the headlight, scrub with a toothbrush or cloth, then rinse and dry. However, proper skills and experience are necessary since applying too much of it along with more force could lead to damage.
What About Protective Sealants?

After cleaning your headlights, applying a protective sealant can help preserve their clarity and protect them from future oxidation. This option is perfect for cleaning other parts of your vehicle as well, such as the windshield, taillights, and more.
There are Different Types
There are various types of headlight sealants available, ranging from waxes and polishes to specialized UV-resistant coatings. These products provide a protective layer over the headlight, shielding it from UV rays, dirt, and grime.
Best Solution For Long-term Protection
Applying a sealant is a simple yet effective way to prolong the clarity of your headlights. After cleaning the headlights, apply the sealant according to the manufacturer’s instructions. This will not only enhance the appearance but also provide a barrier against the elements that can cause oxidation.
When to Replace Headlights?
In some cases, cleaning might not be enough to restore your headlights, and replacement might be the only option. This is often the case when headlights become brittle and cracked due to repeated cleaning or when the cloudiness is too severe to be remedied by surface cleaning.
Most Important Signs
Cracks, deep scratches, or significant yellowing that doesn’t improve with cleaning are clear indicators that it’s time to replace your headlights. Additionally, if you notice a significant decrease in your night-time visibility even after cleaning, it might be time to buy new.
While replacing can be more expensive than cleaning them, it’s a worthwhile investment in terms of safety and vehicle aesthetics. New pair not only enhance the look of your car but also ensure that you have the best possible visibility while driving at night.
The Benefits of Regular Maintenance
Maintaining your car’s lights is not just about keeping your vehicle looking good; it’s a crucial aspect of driving safety. Regular headlight maintenance can significantly enhance your night-time visibility, ensuring a safer driving experience.
Improved Safety
Regular cleaning and maintenance can prevent the build-up of oxidation, ensuring that your headlights are always functioning at their best. This is especially important for night-time driving, where clear visibility is crucial. Well-maintained ones provide a brighter, more focused beam, improving your ability to see and be seen on the road.
Extended Lifespan
By regularly cleaning and protecting them from oxidation, you can extend their lifespan. This not only saves you money in the long run by delaying the need for replacement but also ensures that your headlights remain effective for as long as possible.
Common Misconceptions
There are many myths and misconceptions about headlight cleaning that can lead to ineffective or even harmful practices. Contrary to popular belief, some commonly recommended DIY cleaning methods, such as using bug spray or toothpaste, can be more harmful than helpful.
While these methods might offer a temporary fix, they can damage the headlight material over time and lead to further cloudiness. While household cleaners like Windex or vinegar can be used for headlight cleaning, they have limitations.
They might not be effective against severe oxidation and can sometimes leave a residue that attracts more dirt. It’s important to understand these limitations and use these products cautiously.
Should I Choose Professional Services Instead?

For those who are not comfortable with DIY methods or have severely oxidized headlights, professional headlight restoration services are an excellent option. These services use specialized tools and products to restore headlights to near-factory condition.
Main Benefits
Professional headlight restoration can provide a more thorough and long-lasting solution compared to DIY methods. Professionals have access to higher-grade materials and equipment, ensuring a more consistent and effective restoration.
When to Make This Choice?
If your headlights are severely oxidized, or if you’ve tried DIY methods without success, it might be time to consider professional restoration. This is especially true for older cars or headlights that have not been maintained regularly.
FAQs
How do you make plastic headlight covers clear again?
One way to make plastic headlight covers clear again is to use a headlight restoration kit that contains a cleaner, a polish, and a sealant. You can follow the instructions on the kit to remove dirt, oxidation, and scratches from the headlight lenses and protect them from UV damage. Another way is to use a homemade solution of baking soda and vinegar, which can also clean and polish the headlights.
Is vinegar good for cleaning?
Yes, vinegar can be used to clean headlights. Vinegar is a natural acid that can dissolve dirt and grime from the headlight surface. You can mix vinegar with water and spray it on the headlights, then wipe them with a cloth. You can also soak the headlight covers in vinegar for an hour to loosen the dirt. However, vinegar alone may not be enough to remove oxidation and yellowing from the headlights. You may need to use baking soda or toothpaste as an abrasive to restore the clarity of the headlights.
Does toothpaste clean headlights?
Yes, toothpaste can clean headlights. Toothpaste contains mild abrasives that can polish the headlight lenses and remove oxidation and yellowing. You can apply toothpaste to the headlights with a cloth or a toothbrush and rub it in circular motions. Then, rinse the headlights with water and dry them with a cloth. Toothpaste can also whiten the headlights and make them shine brighter. However, toothpaste may not last long and may need to be reapplied frequently to maintain the results.
Will WD-40 restore black plastic?
WD-40 can temporarily restore black plastic by adding shine and color to the surface. WD-40 is a lubricant that can coat the plastic and make it look new again. You can spray WD-40 on a cloth and rub it on the plastic trim, bumper, or dashboard of your car.
However, WD-40 does not permanently reverse the fading or damage of the plastic. It may wear off over time and expose the plastic to further deterioration. You may need to use a special plastic restorer or wax to protect the plastic from UV rays and dirt.
How long do you leave baking soda on your headlights?
You can leave baking soda on your headlights for a few minutes to clean and polish them. Baking soda is a natural abrasive that can remove dirt and oxidation from the headlight lenses. You can make a paste of baking soda and water and apply it to the headlights with a sponge or a cloth.
Then, buff the headlights with the paste for 2 to 5 minutes. After that, rinse the headlights with water and dry them with a cloth. You can also add vinegar to the baking soda paste for more cleaning power. Baking soda can brighten and clarify the headlights, but you may need to apply a sealant or a wax to prevent them from fogging up again.
Summary
Headlight maintenance is a crucial aspect of vehicle upkeep that should not be overlooked. Whether you choose to clean your headlights at home with baking soda or seek professional services, the key is regular maintenance and protection.
Regular cleaning and protection of your headlights can save you time and money in the long run. By keeping on top of maintenance, you can ensure that your headlights remain clear and effective, enhancing your safety on the road.